Hey everyone, it is Brad, welcome to our recipe site. Today, we’re going to make a special dish, kabocha squash no-bake cheesecake. It is one of my favorites food recipes. This time, I will make it a bit unique. This will be really delicious.
Kabocha Squash No-Bake Cheesecake is one of the most popular of recent trending meals in the world. It is easy, it is quick, it tastes yummy. It’s appreciated by millions daily. Kabocha Squash No-Bake Cheesecake is something which I have loved my entire life. They are fine and they look fantastic.
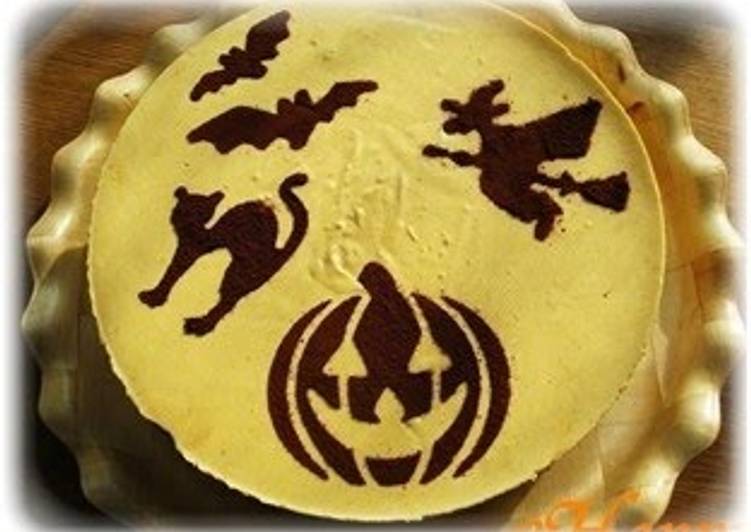
This week we are kabocha squash cheesecake♥. Kabocha is also known as Japanese pumpkin. Please let me know if you have questions or suggestions~.
To begin with this recipe, we have to first prepare a few components. You can have kabocha squash no-bake cheesecake using 9 ingredients and 12 steps. Here is how you cook that.
The ingredients needed to make Kabocha Squash No-Bake Cheesecake:
- Take ★ Kabocha squash (peeled and strained)
- Prepare ★ Soy milk cheese (270 g of soy cheese can be made with 900 ml additive-free soy milk + 150 ml lemon juice)
- Make ready ★Sugar (cane sugar)
- Get ★ Margarine (or shortening + a pinch of salt)
- Make ready ★Lemon juice
- Get pack ☆ Soy milk whip (+ 3 tablespoons sugar whipped to stiff peaks)
- Make ready ☆Gelatin
- Make ready ☆Water
- Take Cookie base (refer to the hints section)
Kabocha squash brushed with olive oil and seasoned with salt is roasted until tender in this easy base recipe with all sorts of applications. Place kabocha squash wedges cut-side up in a baking pan. Sprinkle lightly with sea salt. (No pun intended) This Kabocha Squash Feta Salad is booming with flavor and color. Kabocha squash, chocolate and olive oil make a delicious combination in this cake, adapted from LA's Gjelina restaurant cookbook. [Homemade] Braised Pork Ramen with baked kabocha squash.
Instructions to make Kabocha Squash No-Bake Cheesecake:
- Let's start by making some soy milk cheese. Warm the soy milk up to approximately 45°C, add the lemon juice, stir lightly and leave it to cool. Once cooled, wrap in a cheesecloth to separate the cheese from the water.
- Mix together the ingredients marked with ★ . Give the mixture a taste and play around with the ingredients here to achieve your desired taste!
- Add some water to a mug and soak the gelatin. Add sugar to the soy milk whip and whip until stiff peaks form.
- Warm the gelatin mix in the microwave for 1 minute until completely dissolved.
- Add the gelatin to the mixture from Step 2 and mix well.
- Add the soy milk whip from Step 3 and mix well once more.
- Add some crushed rice flour cookies or some rice flour cake sponge to the bottom of the cake tin and pour the mixture on top.
- Once you've poured in the mixture, drop the tin from a short height onto the work surface to eliminate any excess air bubbles. Chill and set well in the fridge before removing from the tin.
- Decorate it to your preference.
- I decorated this one with cocoa powder.
- When separating the remaining liquid from the soy cheese, you can keep the liquid and mix it with honey to make a really delicious drink.
- You can use the left over soy cheese in a sandwich or eat it on its own with jam.
An easy way to prepare kabocha squash is to wash the exterior with plain water (no soap), then cut the squash in half. Place the squash cut sides down and bake for. Kabocha squash is a staple at any Japanese restaurant. This bright orange fruit is often served battered and fried in vegetable tempura. It can easily be mistaken for sweet potato due to its color, velvety texture, and buttery flavor.
So that is going to wrap this up for this special food kabocha squash no-bake cheesecake recipe. Thanks so much for reading. I’m confident you can make this at home. There is gonna be more interesting food in home recipes coming up. Don’t forget to bookmark this page on your browser, and share it to your loved ones, colleague and friends. Thanks again for reading. Go on get cooking!